
Overview
This article walks you through how to set up and configure a Family Membership in Core. Family Memberships let one master parent account manage payments, bookings, and activity for linked child accounts - all under one membership plan. This makes it easier for parents to handle schedules and billing for their children, while still giving kids their own logins and independence where appropriate.
Difference between Family Accounts & Shared Credits
Family Membership is different from Shared Credits (which share prepaid credits) and Book a Buddy (which books a friend into a single class). Instead, it’s a continuous account relationship with centralized payments and clear permissions.
Family Account Benefits:
-
Centralized Management: Parents handle all payments, bookings, and permissions for the family from one account.
-
Discounted Pricing: Family memberships offer bundled savings compared to multiple individual memberships.
-
Individual Logins: Children have their own logins, giving them independence where age-appropriate.
-
Full Oversight: Parents can view schedules, attendance, and credit usage for each child.
Prerequisites
-
Contact our Hapana Support team by raising a ticket to express interest in the Family Accounts feature.
Steps
1. Configure a Family Membership (Admin Setup)
-
Log in to Core
-
Go to Payments > Retail Configurations
-
Select either Session Package or Memberships
-
Click + Create New Membership Type
-
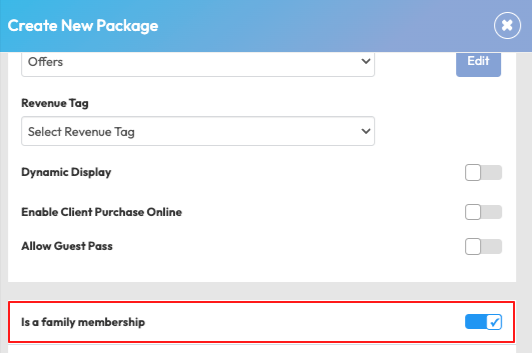
Name the membership (e.g. Family Membership - Gold Plan)
-
Switch the 'Is a family membership' or 'Is a family package' toggle to ON

7. Set limits for number of:
-
Additional Parent Accounts (e.g. 1 parent). Please note: There will only be one parent account associated with the billing information.
-
Child Accounts (e.g 4 children).
9. Select 'Add Package' to save the package or membership
Important note: Once a Family Membership is created, it can’t be changed back to a standard membership. The family toggle cannot be turned off, and features like Shared Credits and Guest Passes are disabled, as the family membership already acts as a shared credit for a defined group. Once a package is created without family membership toggled, it cannot be converted to a family membership later.
2. Manage Family accounts in Core (Admin Setup)
- Go to Clients > Select relevant client profile
- In Client Information sub tab, scroll down to Family Accounts
- Select either '+Add child' or '+Add parent'
- Enter Email, Name, Last name and Date of Birth
- Set permissions from the following options:
-
Book/Cancel Sessions
-
View family activity
-
Manage child permissions (Parent only permission)


How to Use Family Accounts on the App
Please see our Managing Memberships in the App article for detailed information on how Parents & Children can use and manage Family Accounts on the app.
How Parents Purchase a Family Membership via App
-
Log in to the app
-
Navigate to More
-
Select Buy new packages
-
Select family membership from the list
-
Purchase a new Family Membership
Child Account Setup
- From your Family Account, select Add a family member.
- Choose Invite an existing member.
- Child receives the invite deep link to download Branded (Hapana) app. This will open Branded (Hapana) app or directs them to download in the App Store if they don’t have it.
- They login to app with their credentials.
- Select Join family to accept the invite to be part of the family account
Alternatively, if the child does not have their own email address or does not need access to the app, a parent can now create a child profile directly from their Family Account without sending an invite:
- From your Family Account, select Add a family member.
- Choose Create a managed child profile.
- Enter the child's basic details such as Name and Date of Birth.
- The child profile is created and linked to your family account immediately, with no invite sent and no acceptance needed.
Manage Family Members (Parent)
-
Open the app and go to Your Family Account > View Account.
-
View linked children and their schedules.
-
Book, cancel, or reschedule classes for each child.
-
Track attendance, credits, and booking history.
Expected Outcome
Once configured, parents can manage the whole family’s schedule and payments from a single account. Children enjoy individual logins and autonomy (where allowed), while businesses gain stronger retention and new revenue opportunities.
Reach out to our support team via support@hapana.com.