
 1319
1319
Overview
This article walks through how to add a new class session to your schedule in CORE. You'll learn how to set up recurring sessions, choose templates, assign instructors, and apply best practices to avoid common setup issues.
🎥 Watch the walkthrough:
Or preview it below:
Prerequisites
- Instructor and session templates must already be configured
- Admin or scheduling access in CORE
Step-by-step instructions
Step 1: Choose the time slot
- Go to Schedule
- Find an available time slot on the calendar where you want to add a class
- Click the open time slot


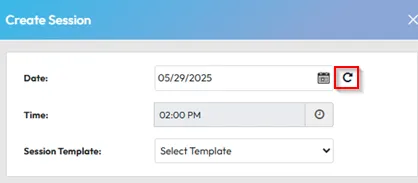
Step 2: Set up session recurrence
- Before selecting a template, click the arrow icon to configure recurrence
- Choose one or more days for the session to occur (e.g. Monday, Wednesday, Friday)
- Decide if there is an end date or leave it open-ended for ongoing classes
- Confirm the time (e.g. 1:00 PM)
Tip: If you're adding classes for multiple days, set them up individually to prevent unintended bulk changes when editing later.

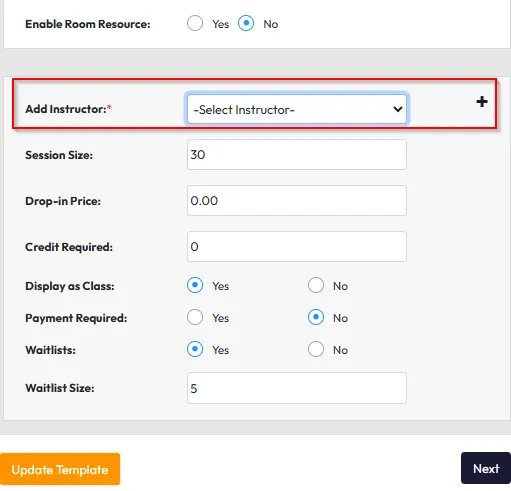
Step 3: Select a class template and instructor
- Click to select your session template (e.g. Yoga Flow)
- Assign the Instructor
- To Assign more than one Instructor, Click the Plus (+) on the right
- Click Next


Step 4: Finalize the session
- Optionally add clients, but in most cases, clients will book via the app or widget
- If you do invite clients, you can email them an invite by selecting the “Send invite email to client” checkbox at the bottom.
- Click Create to save the session(s) to the schedule

Expected outcome
The session appears on your schedule at the chosen time and recurrence pattern, ready for clients to view and book.
FAQs
Q: Can I make changes to just one day of a recurring session?
A: Only if the session was added individually. Edits to a series will affect all days in that group.
Q: How do I stop a recurring session?
A: Edit the session and add an end date, or manually delete future occurrences.
Q: Can I assign different instructors for each day in a series?
A: Only if each day is added as a separate session.
Still need help?
Reach out to our support team via [email protected]

