
 590
590
Overview
This article walks through the different ways to process a new sale in CORE — including memberships, packages, products, gift cards, and custom payments. You’ll also learn how to allocate sales to clients, manage multi-client checkouts, and send agreements or payment requests.
🎥 Watch the walkthrough:
Or preview it below:
Prerequisites
- Admin or front desk access to CORE
- Products, memberships, and gift cards already configured in your account
Ways to access the New Sale screen
- Payments > New Sale
- Retail Dashboard > New Sale (top right corner)
- From a Client Profile > Click New Sale
Tip: Accessing from the client profile automatically pre-fills the client in the sale.


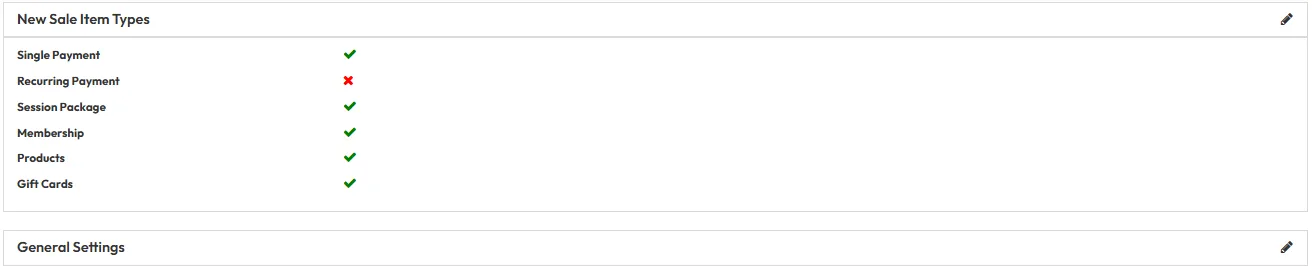
New Sale Item Types
You can enable or disable these options in Retail Configurations > New Sale Item Types:
- Single Payment: One-off custom charge (e.g. late fee, casual pass)
- Recurring Payment: Ongoing manual billing (used for suspensions or manual cycles)
- Session Package: Credit-based pass (e.g. 10-class pack)
- Membership: Ongoing access based on a membership configuration
- Product: POS item like water bottles, mats, apparel
- Gift Card: Configured and branded digital gift card


Step-by-step instructions
1. Single Payment
- Select Single Payment
- Fill in:
- Invoice Date
- Description (what the charge is for)
- Price, Discount, Tax
- Add to Cart
- Add client to the sale
- Proceed to Checkout and choose payment method (Card, Cash, EFTPOS)


2. Recurring Payment
- Select Recurring Payment
- Set:
- Billing Cycle (e.g. every 2 weeks)
- Recurring Period (until cancelled or set end)
- Price, Tax, Setup Fee
- Auto-Renew toggle (optional)
- Add to Cart, add client, then Checkout
Tip: Recurring payments do NOT assign booking credits. Use memberships for that.


3. Session Package or Membership
- Select either Session Package or Membership
- View options using the Eye Icon
- Select the desired package/membership
- Set:
- Activation date
- First payment date
- Setup fee, Tax
- Credit validity (for memberships)
- Add to Cart and assign client(s)
Tip: This method is the only way (besides the app) to allocate credits that allow booking into sessions.


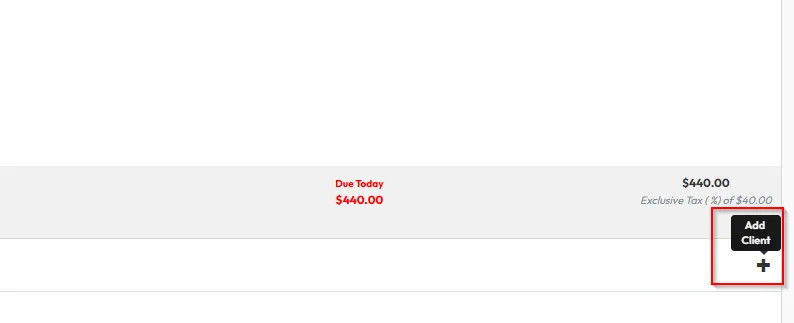
4. Assigning Clients and Relations
- Click the + icon to add the purchasing client
- Use the Relations tab to:
- Add a relation (e.g. parent paying for child)
- Choose which relation pays
- Optionally send a Payment Request instead of paying immediately


5. Agreement Collection (if configured)
- Choose whether to:
- Send Agreement Online (via email)
- Display on Screen for immediate signature
Tip: Displaying the agreement in-studio is faster and ensures the member can attend right away.


6. Product and Gift Card Sales
- Select Product or Gift Card
- Choose from configured items (e.g. socks, water bottles)
- Add to Cart, assign client(s), then Checkout
Tip: When assigning items to multiple clients, do not increase item quantity — CORE duplicates the items across all selected clients automatically.


7. Final Checkout Steps
- Confirm all items and clients
- Choose a payment method:
- Credit Card (processes online)
- Cash or EFTPOS (manual entry)
- Click Pay Securely or Confirm Payment depending on method


Expected outcome
The sale is completed, with the client(s) receiving the appropriate items (credits, memberships, products, gift cards), and all invoices correctly recorded.
FAQs
Q: Can I assign a product or membership to more than one client?
A: Yes — select multiple clients and CORE will create individual invoices for each.
Q: Can I hide Gift Cards or Products from the sale screen?
A: Yes — toggle visibility in Retail Settings > New Sale Item Types.
Q: What happens if I don’t select a payment method?
A: The invoice will sit as an outstanding payment until completed.
Still need help?
Reach out to our support team via [email protected]

