
 517
517
Overview
This article covers how to quickly process a new sale in CORE — including where to launch a sale, how to configure credit activation and payment dates, and apply discounts. This is ideal for scenarios like free trials, future billing, and streamlined membership setup.
🎥 Watch the walkthrough:
Or preview it below:
Prerequisites
- Admin or front desk access to CORE
- Packages or memberships pre-configured in CORE
Step-by-step instructions
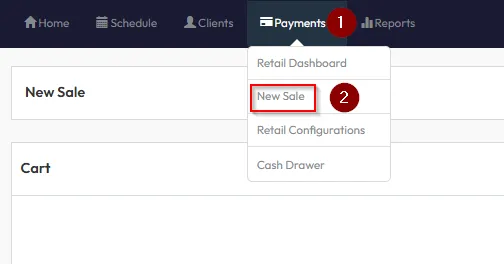
Step 1: Access the New Sale screen
You can launch a new sale from three locations:
- Payments > New Sale
- Retail Dashboard > New Sale (top right corner)
- Client Profile > Click New Sale (auto-fills client into the cart)
Tip: Using the client profile method saves time by pre-filling the sale for that member.


Step 2: Add a package or membership
- Click Session Package or Membership
- Choose the item you want to sell
- Configure the following settings:
- Credit Activation Date: When the client can start booking into classes
- First Payment Date: When the client is first charged
Example: Allow class bookings from today, but delay payment until next week.


Step 3: Adjust credit validity and apply discounts
- Credit Valid Until: Optional expiry date for credits
- Choose one of the following for pricing:
- Custom Price
- Percent Discount (e.g. 20% off)
Tip: To offer a 100% discount and still track in reports, use Percent Discount set to 100% instead of “Allocate Without Payment.”

Step 4: Add clients and proceed to checkout
- Add Selected Clients (you can assign multiple)
- Click Checkout
- You’ll see a Pending status until you choose a payment method


Step 5: Finalize the sale
- Choose Card / Bank as the payment method
- If there is a client agreement, you'll be prompted to:
- Send agreement (email)
- Or Display on screen for immediate signature
- Click Confirm Payment to complete the sale


Expected outcome
The membership or package is successfully sold and assigned to the client, with credits activating as scheduled and payments processed or scheduled accordingly.
FAQs
Q: Can I give a client a free week before charging?
A: Yes — set Credit Activation Date to today and First Payment Date to one week later.
Q: Why is the invoice still pending after checkout?
A: You must select a payment method before the invoice becomes active.
Q: What’s the best way to track a free offer?
A: Use a 100% percent discount rather than “allocate without payment.”
Still need help?
Reach out to our support team via [email protected]

