
 261
261
Overview
ClassPass is a popular fitness membership platform that allows people to explore gyms, studios, and wellness venues with one subscription. By connecting your business with ClassPass, you can fill empty class spots, attract new members, and streamline operations with automated bookings.
This guide walks you through enabling the Hapana / ClassPass integration, configuring class settings, and managing ClassPass bookings in your system.
What does the Hapana ClassPass Integration do?
The Hapana ClassPass Integration connects your Hapana schedule with ClassPass to help you reach new audiences and keep bookings in sync automatically.
Your Hapana classes appear in the ClassPass app for users to discover and book. Bookings made in ClassPass sync directly back to Hapana, keeping your schedule accurate and up to date.
Enable ClassPass Integration
1. Contact Hapana Support
-
Reach out to our support team to express interest in ClassPass integration
-
Our team will:
-
Enable the ClassPass integration for your business.
-
Provide your location ID
-
-
Contact ClassPass Support team and share your location ID
2. Contact ClassPass Support
- Current ClassPass Partners: Contact the ClassPass support team by using the Partner Support Chat Agent in the lower right corner of your Partner Dashboard. Provide as much detail as possible and the ClassPass Support team will assist you in completing the integration.
- Onboarding ClassPass Partners: Provide your integration IDs in the form sent in your onboarding emails or email your information to [email protected] The Onboarding Team will complete your integration prior to your page going live on ClassPass.
Configure Class Settings
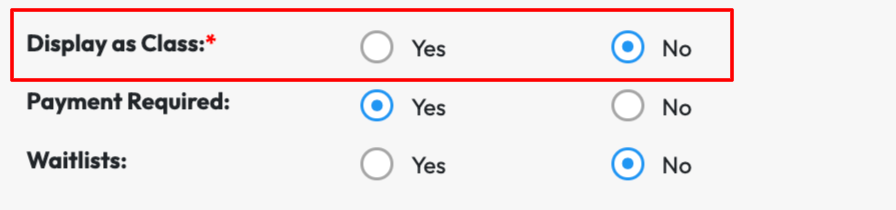
1. Enable 'Display as Class' when Setting up Class
The 'Display as Class' setting must be set to Yes in your Hapana account for the class to appear in ClassPass.
- Log in to Core
- Navigate to Schedule
- Create a new Session or edit an existing session
- Ensure the 'Display as Class' setting is set to Yes
- Save
2. Allocate Spots for ClassPass
-
Ensure Room Resource Configuration is set up in Edit Profile > Room Resource Configuration. Please see our How to Set up Room Resource Configurations Guide for more information.
-
Navigate to Account Settings > Configuration
-
Go to Business Profile > Edit
-
Scroll down to Allocate random spots to ClassPass users
-
Switch to Yes
-
Save the session.

Manage ClassPass Bookings
View Reservations
-
ClassPass bookings display in your schedule with Payment Type listed as ClassPass
Mark Attendance
-
Open the class session
-
Locate ClassPass members (they appear with all attendees).
-
Mark attendance normally - updates sync back to ClassPass.
Expected Outcome
By completing these steps, your business will:
-
Appear in the ClassPass app, reaching new audiences.
-
Have ClassPass bookings seamlessly synced with your schedule.
Need more help? Reach out to our support team via [email protected].

